Illustrator and SVG
Some vector design tools as Inkscape or Illustrator allow using SVG format with different results. My objective is to try Illustrator and analyze if it is the most suitable tool to create and manipulate SVG files.
First of all, we have to configure the work space in Illustrator to work with SVG and we also must take into account certain aspects:
- In Preferences> Units…, I select pixels as units as it’s the default unit used by SVG.
- Also in Preferences>Units…, in the field “Identify Objects By”, I select the XML ID option. This option serves to adjust the layers panel so that the names assigned to the different elements fit the conventions of XML names. The names must start with a letter, underlined or colon and they cannot contain spaces. Nor should two equal names be used as the names will be used as ID. This way, when naming the different elements, SVG will identify them with ID by the name given by us in the layers panel.
 ystem is the same used by SVG, and HTML, but in previous versions to CS5, the origin of ‘y’ was down and increased upwards. Then, if you use a previous version to CS5, I would recommend to place the axe ‘y’ on the upper part of the work desktop. To do that, you have to click on the square which is where the rules join and drag till the top left point of the work desktop. It has to be taken into account that this repositions the ‘y’ origin point but the increase direction of the coordinates will keep on being from the bottom up. This way, if we want to place an element 10x under the upper part of the work desktop, we will have to assign a negative value of -10px to ‘y’ within Illustrator.
 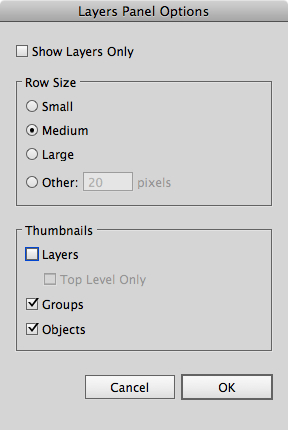 On the layer panel, to make a difference among the layers, the groups and the objects, we should configure the display options from the layer panel. To do that, we click on the layer panel and we select Panel Options… on the window Layers Panel Options, in the thumbnails section, we select only groups and objects. This way, only the thumbnails of the groups and objects will be visible and the layers will have less visual importance on the panel. The groups differ from the objects because these ones do not have a triangle in order to be displayed. I think it is the most suitable configuration as in SVG there is not an equivalent to the Illustrator layers, so if we use layers when working with an illustration, to save it as SVG, Illustrator will turn the layers into groups. This way, when reopening the SVG file in Illustrator, we will see that what we had as layers before, are groups now. As far as I am concerned, I would recommend not to use layers if you want to save it as SVG, unless you keep a version of it in Illustrator format.
- On the Layers panel in Illustrator, the stacking order of the elements is in contrast to SVG, as in Illustrator, the elements which are behind are below on the list of the Layers panel. In SVG, on the contrary, the elements that appear before on the code are those shown below, as it happens in HTML.
- The Illustrator symbols are exported as symbol in SVG only if they are used, otherwise they will disappear from the symbols panel. Because of that, if you do not want to lose the symbols you may have created and you are not using, it is advisable to save the document as Illustrator format and to use SVG only as a final exporting format.
- The filters which are not SVG convert the object to which they have been applied on the image.
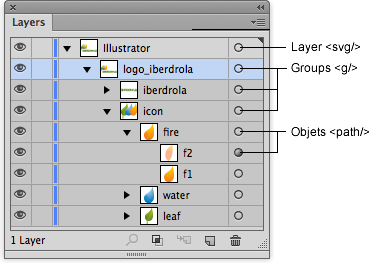 I have located the Iberdrola logo in vector format and I have opened it in Illustrator in order to convert it to SVG. In order for the code generated by Illustrator to be easy to use afterwards, I organize the different elements of the logo in groups without using layers. The only layer that will appear will be the container layer of all the objects, as in Illustrator it is required that the objects go in at least a layer. The name of the main layer will be used as ID of the SVG element.
We can adjust the size of the artboard to the size we wish to assign to the SVG, but only an artboard will be exported although other elements from other artboards will be exported but will not be visible.
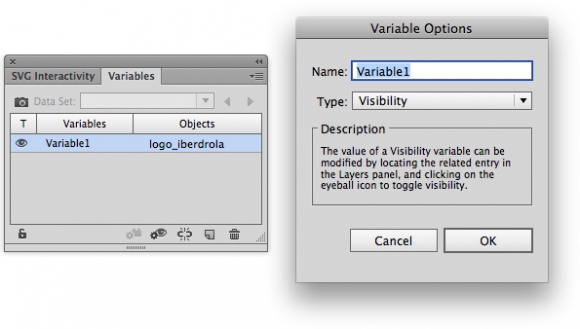
We have a variable panel which is useful for modifying some aspects of the objects. I have not had a look at all the aspects of this panel, but I found it of little use. For example, if you assign an object as variable and you assign it as visibility type, when you hide the object from the layer panel, the object in SVG will not be visible as it will have been assigned display= “none”.
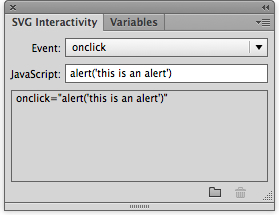
Besides this, we also have the SVG interactivity panel which simply allow us to assign JavaScript functions to events, something that makes more sense if you insert them from a text editor.
If we make changes in the SVG from a text editor and we reopen it with Illustrator, when you save it again, the changes made from the text editor will be lost. So, if you want to manipulate the code, the best thing to do is using Illustrator as a tool to generate the code of the shapes, gradients and other graphic elements, but not to execute functions from there as we will be soon limited and forced to use an editor. Also, in order to keep all the elements we have created in Illustrator, as styles, color palette, symbols, etc…, we will have to keep the file as an original Illustrator format.
Finally, as the main interest I see in Illustrator with respect to SVG is the creation of graphic elements, it is important to take into account the different options this offer when exporting to SVG. On the following image you can see the different options I have used. From all of them, one of the options I like the most is to be able to insert the CSS properties as an internal style sheet. Anyway, the configuration possibilities are scanty and there are not any options of format configuration, order of the elements as gradients, etc.

Good article. This part of illustrator could really do with a serious overhaul, now that SVG is (finally) becoming popular.
A couple of extra tips that might belong here:
You can put a script element directly into your SVG code, although many browsers require type=”text/ecmascript”. Element IDs can be targeted. DOM methods such as setInterval, setTimeout and requestAnimationFrame are available, so you can make a scripted animation in a self-contained SVG file. This is very cool, although a little fiddly.
Caveat: Many edits to SVG code (including any added script elements and xlink:href attributes) are stripped out when you open the SVG file in Illustrator. This seems like very nasty behavior, and deserves a warning in the docs. Or they should just ensure it doesn’t happen.
If you make a Symbol (drag some vectors to the symbol panel), and use it in your Illustrator document, the exported SVG will end up with a ‘symbol’ element, describing that symbol, and a ‘use’ element linked to the symbol definition, but *only* if there is more than one instance. This may lead to significant size reductions if you have many copies of the same complex shape. Caveat:If you have only one instance of a symbol, style elements are not generated, even if you’ve set it to do so, so you’ll just get attributes instead. (Surely a bug).
JavaScript added to symbol definitions do not make it into the SVG, whereas javaScript added to symbol instances do. However, I notice that mouseover events appear to fire every time the cursor enters *all* the shapes described inside the symbol definition, rather than just the outer boundary of the instance. Surely not the intended behavior. This may be a browser-specific bug. I see it in Safari and Firefox, but not in Chrome.
I need some tutorial for svg interactivity in illustrator. whether the alert message only be used on svg interactivity? Also let me know what are the commands to be used in svg interactivity on illustrator.
Kindly reply to my mail about the tutorial or even send the document of it. thank you